

Backend Deployment
We provide an official Docker image: spotify/xcmetrics.
You can also build your own, this repo includes a Dockerfile that you can use to build a docker image (docker build .) that can be deployed to your own Docker registry.
1. Requirements
The Backend needs Redis, a PostgreSQL database (>= 12) and optionally a Google Cloud Storage Bucket.
You can pass the setting of those servers as Environment Variables:
-
REDIS_HOSTIP of the Redis server. Example:127.0.0.1 -
REDIS_PORTPort of the Redis server. Example:6379 -
REDIS_PASSWORDPassword for the Redis server. The default value is nil (unset). -
REDIS_CONNECTION_TIMEOUTNumber of seconds to timeout the connection to Redis. The default value is3. -
DB_HOSTPostgreSQL host. The default value islocalhost -
DB_PORTPostgreSQL port. The default value is5432 -
DB_USERPostgreSQL user. The default value isxcmetrics-dev -
DB_PASSWORDPostgreSQL user’s password. The default value isxcmetrics-dev -
DB_NAMEName of the database. The default value isxcmetrics-dev
GDPR and Privacy
-
XCMETRICS_REDACT_USER_DATAIf this flag is"1"the Data will be anonymized, meaning that both the username and the machine name will be hashed using MD5 and the hash will be stored instead of the full names. Also, in all the file paths contained in the logs, the User folder will be redacted. For instance, instead of/Users/mary/MyProject, the data inserted in the tables will haveUsers/<redacted>/MyProjectpaths
Single instance deployment
The easiest way to deploy the Backend is using only one instance that have both the Endpoints and the Job in the same process.
In this case, you don’t need Google Cloud Storage. The Endpoint’s controller will store the log files in disk and, because the Job will be running in the same machine, the Job will just read them from there.
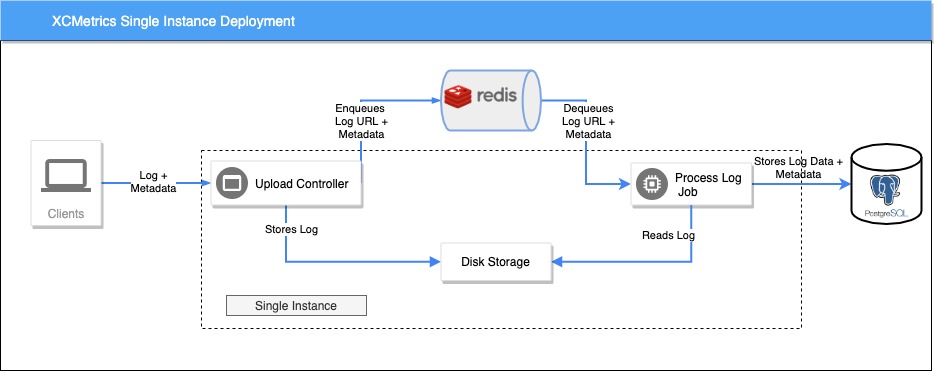
Having a single instance running limits the amount of logs that can be processed. A Job runs in an EventLoop and Vapor creates one per CPU core, additionally each EventLoop has a Database pool. This makes the max number of logs that can be processed in parallel to be:
number of cores * connections per pool
By default, we configure 10 connections per pool. You can change that number if your Database instance supports it.
You can check an example Kubernetes deployment files of this scenario in the folder DeploymentExamples/SingleInstance
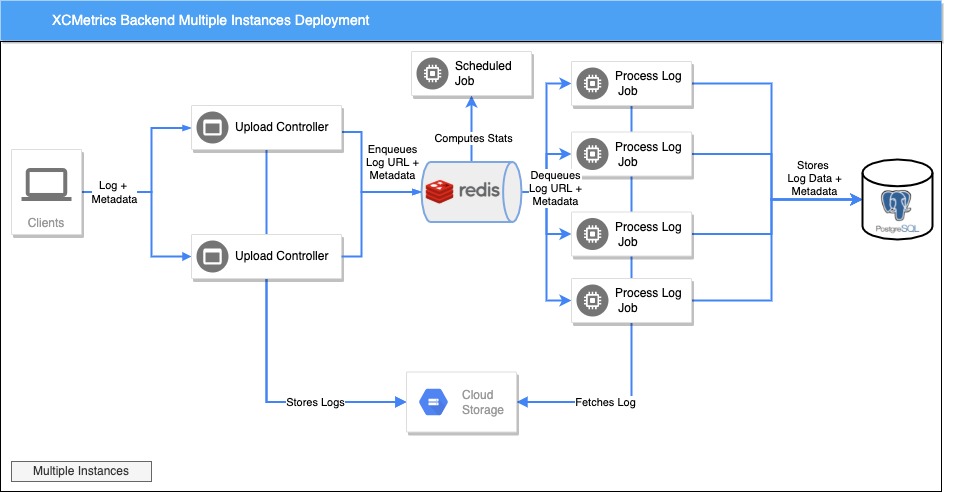
Multi instance deployment
Having multiple instances will make the Backend to be more fault tolerant and more performant. You can process more logs in parallel.
By far, the most resource-consuming task that the Backend does is parsing the Xcode logs. So it’s advisable to deploy more instances that only run the ProcessMetricsJob than instances with the Endpoint to upload the Logs.
This diagram shows how such a deployment will look like:
For this to work, you’ll need to configure an extra Set of Environment Variables:
-
XCMETRICS_START_JOBS_SAME_INSTANCEShould be set to"0". This will instruct the backend to not start the ProcessMetricsJob in the same instance than the Endpoints.
In this configuation, the Controller needs to store the logs in the Cloud, not in disk. So the Jobs can download them from there. XCMetrics supports two Cloud Storage Systems: Amazon S3 and Google Cloud Storage
Amazon S3
You will need to create a new S3 Bucket and a new User with permissions to write and read from it. You can follow the instructions in this Amazon AWS document
-
XCMETRICS_USE_S3_REPOSITORYShould be set to"1". -
XCMETRICS_S3_BUCKET. The name of the Bucket in S3. You need to create the Bucket manually. -
XCMETRICS_S3_REGION. The region where the bucket lives, use the identifiers listed in Amazon documentation. -
AWS_ACCESS_KEY_ID. The Access Key Id of an Amazon IAM User with permissions to the bucket -
AWS_SECRET_ACCESS_KEY. The Secret Access Key Id of an Amazon IAM User with permissions to the bucket
Google Cloud Storage
-
XCMETRICS_USE_GCS_REPOSITORYShould be set to"1". -
XCMETRICS_GOOGLE_PROJECTIdentifier of the Google Project where the GCS Bucket lives. -
GOOGLE_APPLICATION_CREDENTIALSPath to the.jsonGoogle Cloud credentials file. The service account to which the credentials belong to, should have write and read permisions on the GCS Bucket -
XCMETRICS_GCS_BUCKETName of the Bucket where the log files will be stored.
You can find example Kubernetes deployment’s files of this scenario in the folder DeploymentExamples/MultiInstances
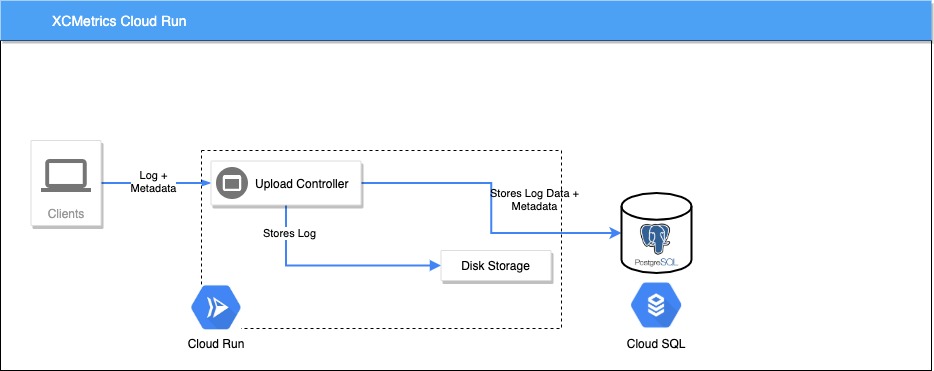
Google Cloud Run Deployment
One quick option to deploy the backend is using Cloud Run in a Google Cloud Project. You will need a PostgreSQL instance deployed outside of Cloud Run, typically in Cloud SQL. One key feature in Cloud Run, is that you only get charged when your App is being used. If there are not requests to it, all instances will be removed and a new one will be spawned when a new request arrives. This makes Cloud Run not a good choice to run Async Jobs, the instance could be killed in the middle of processing a log. Thus, in this case you can disable the jobs and process the logs in the same Endpoint. The response time of the request will be longer, because it will wait for the log to be processed and inserted into the Database before responding to the XCMetrics Client, but Cloud Run plays well with this kind of Endpoints.
Important When you use Cloud Run, the XCMetrics client needs to point to the metrics-sync endpoint. In your Xcode’s PostAction edit it to something like:
${SRCROOT}/../../XCMetricsLauncher ${SRCROOT}/../../.build/release/XCMetrics --name BasicApp --buildDir ${BUILD_DIR} --serviceURL https://yourservice.com/v1/metrics-sync
1. Use our Cloud Run button
The easiest way to start is to click on the following “Run on Google Cloud” button. You will need to configure Cloud SQL manually, you can read the details in the next section.

2. Or enable it manually
Enable Cloud Run and Cloud Build in your Google Cloud Project.
Setup your Cloud SQL PostgreSQL database. Follow the instructions of the Using Google Cloud SQL section
Add permissions to Cloud’s Run Service Account for Cloud SQL. By default, Cloud Run uses the service account named
<project number>-compute@developer.gserviceaccount.com. It will need the permissions Cloud SQL ClientYou can skip the next sections if you’re using “Run in Google Cloud” button.
Use the Cloud Run console to create a new Service. When you’re creating it you need to add the Cloud SQL Connection in Advanced Settings as described here
You will need some specific Env Variables setup so the App can run in this environment:
-
XCMETRICS_USE_ASYNC_LOG_PROCESSING="0"Should be 0, Cloud Run can’t run Asynchronous jobs. -
XCMETRICS_USE_CLOUDSQL_SOCKET="1"Cloud Run uses Unix Sockets to connect to Cloud SQL. -
XCMETRICS_CLOUDSQL_CONNECTION_NAME. You can find this name in the Cloud SQL console. It’s usuallymy_project:gcp_region:cloudql_instance_name -
DB_NAME="database name". The name of the database -
DB_USER="database user". The name of the user with permissions on the database -
DB_PASSWORD. Password to the database, you can also add it as a Secret to Cloud Run
Using Google Cloud SQL
Google offers Managed PostgreSQL instances in its Cloud SQL product. If you want to use one of this as the database of XCMetrics, you will need to do some extra configuration to use it from GKE.
1. Create the XCMetrics database
Create a new CloudSQL Instance for PostgreSQL. The Backend needs PostgreSQL 11.0 or 12.0. You can follow the instructions here
Once you created a CloudSQL Instance, Connect to the instance using the Cloud Shell and create a Database, a user and a password that will be used by the Backend. You can do that by running this script:
CREATE DATABASE xcmetrics;
CREATE USER xcmetrics WITH ENCRYPTED PASSWORD 'mypassword';
GRANT ALL PRIVILEGES ON DATABASE xcmetrics to xcmetrics;
2. Setup Cloud SQL Proxy
Cloud SQL Proxy will allow you to connect to the database from your computer and from GKE (If you choose to deploy the Backend using Kubernetes). Follow this instructions to enable it and to test it locally. Once you connect to it locally, you can use a PostgreSQL client (Postico is a good one) from your computer to query the tables once they have data.
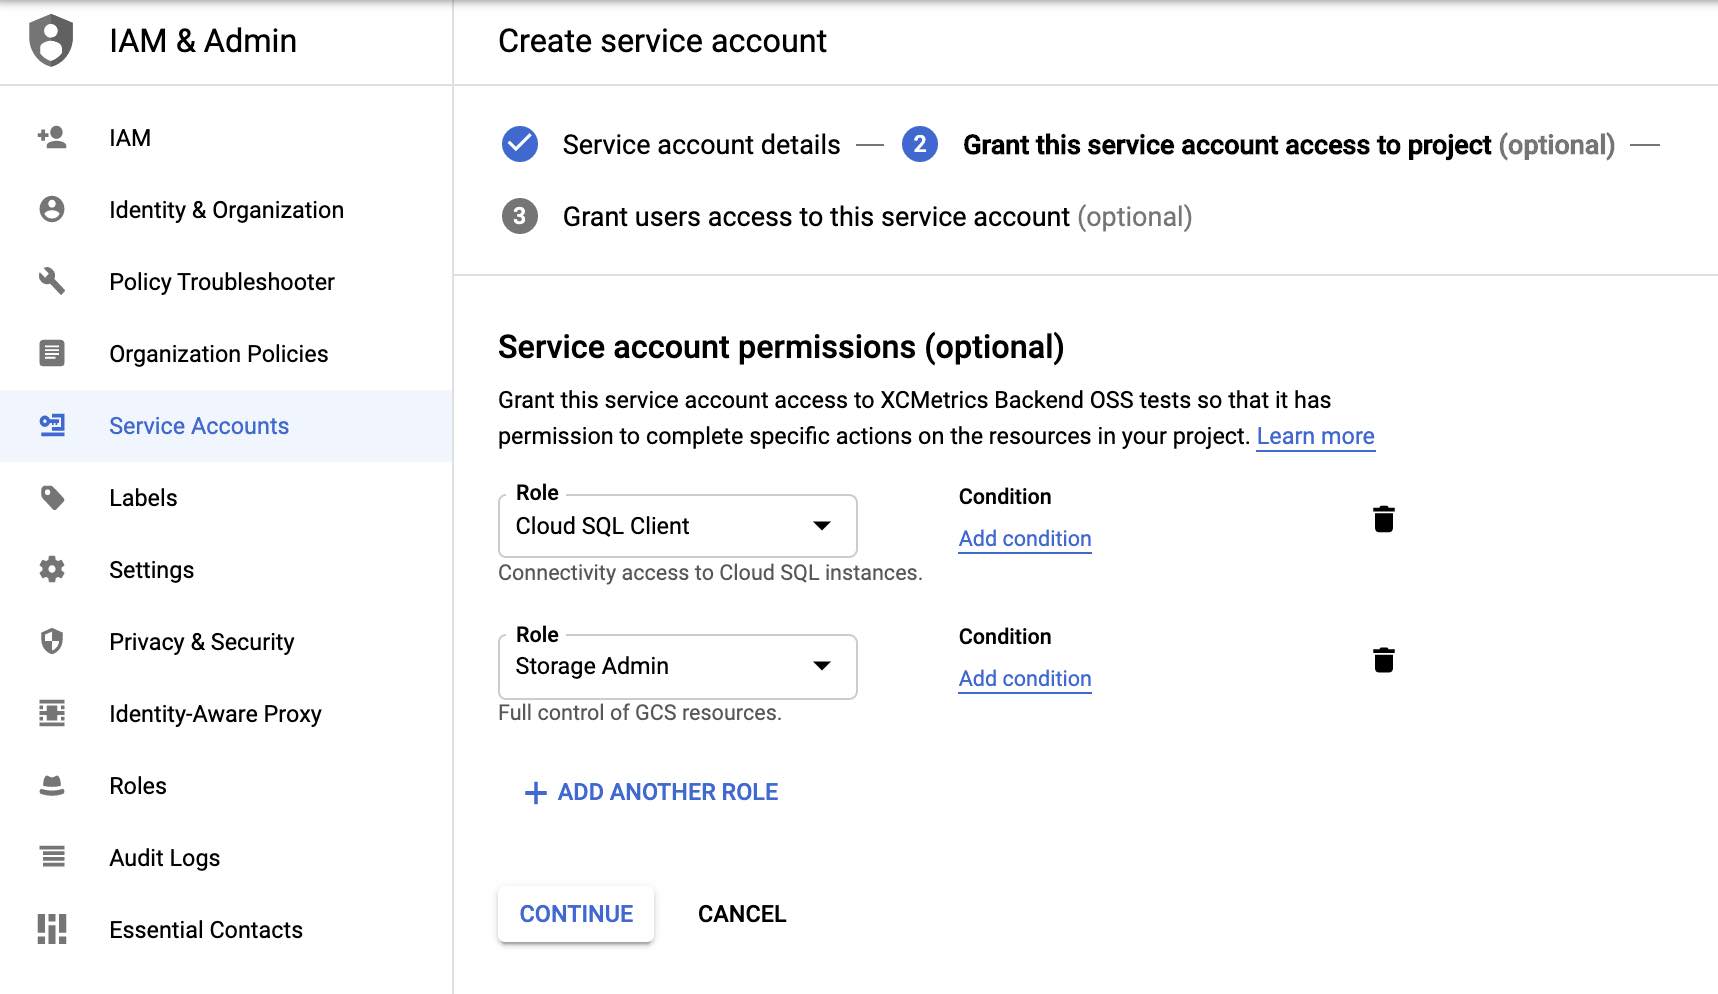
3. Give permissions to your Service Account
The next step is to assign permissions to the Google Service Account that you’re going to use with XCMetrics. Especifically, you will need the Cloud SQL Client permission and ghe Storage Admin:
4. Kubernetes (GKE) configuration
If you plan to deploy the Backend to GKE, You will need to do two things in order to connect it to Cloud SQL: create a Kubernetes Secret to store the password and the Google Service Account and setup Cloud SQL as a sidecar container. You can find the instructions here
Deploy to GKE
Pre requisites
A Google Cloud Project
Install The
gcloudcommand line tools (download page and configure it with your project by runninggcloud init.Setup Cloud SQL following the instructions of the previous section.
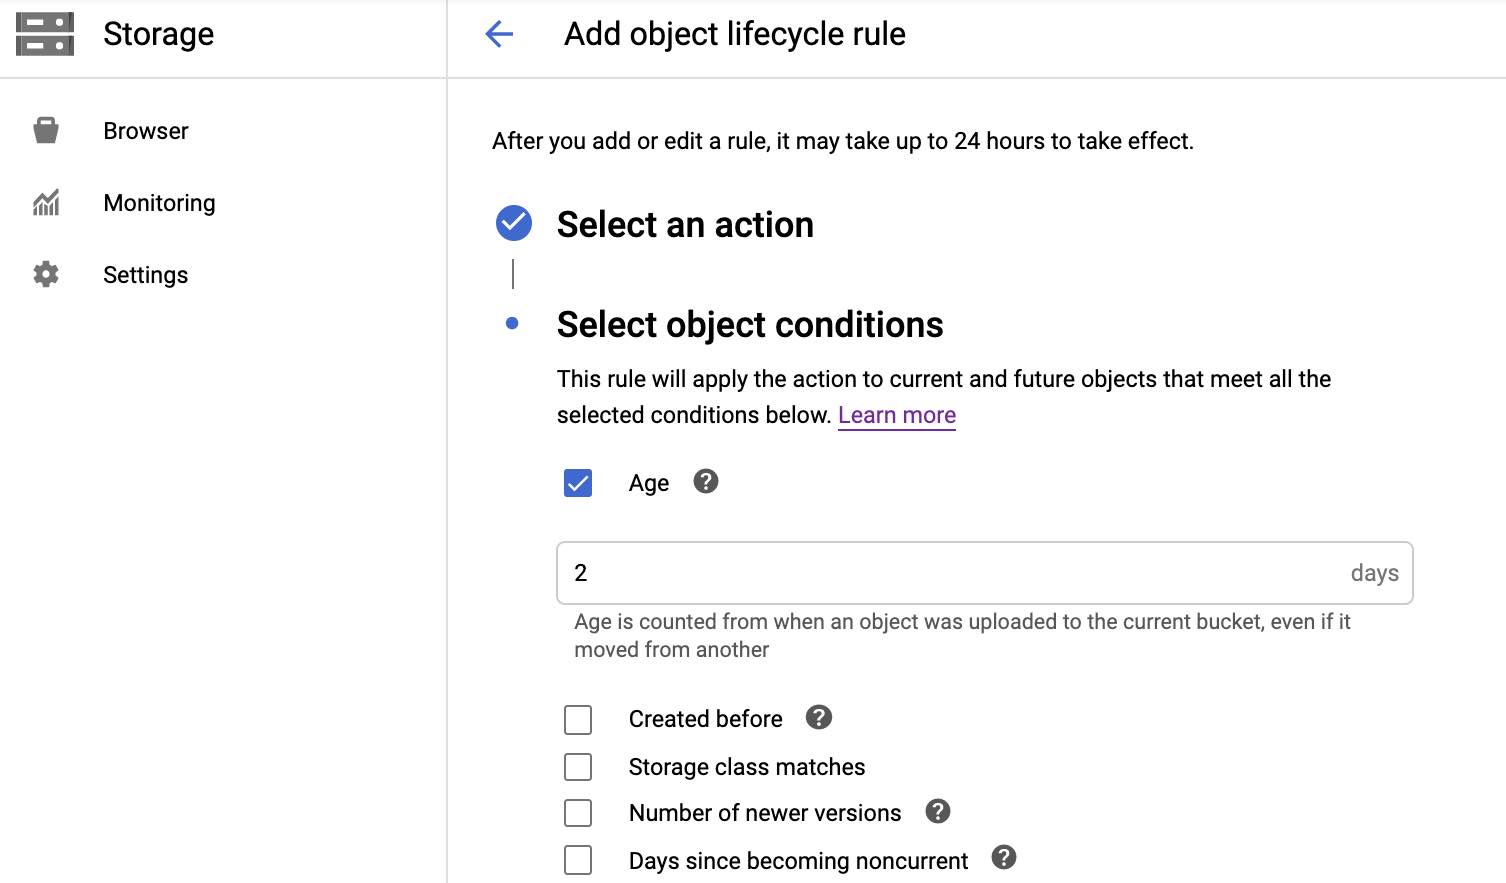
If you’re planning to do a MultiInstance deployment, create a Google Cloud Storage Bucket. Use the same region where your Cloud SQL Instance is. A good advice is to add a Lifecycle Policy, so the logs will be automatically removed after a period. Open the bucket you just created and look for the
Lifecyclemenu in the upper bar. In this example we’re setting up that the logs will be deleted after 2 days:
Create a new Service Account and give it the permissions for CloudSQL Client and Storage Admin. Generate a JSON credentials file and save it locally. You can check the steps in this page.
Enable the Cloud Build API in your project following the Before you begin instructions in this document
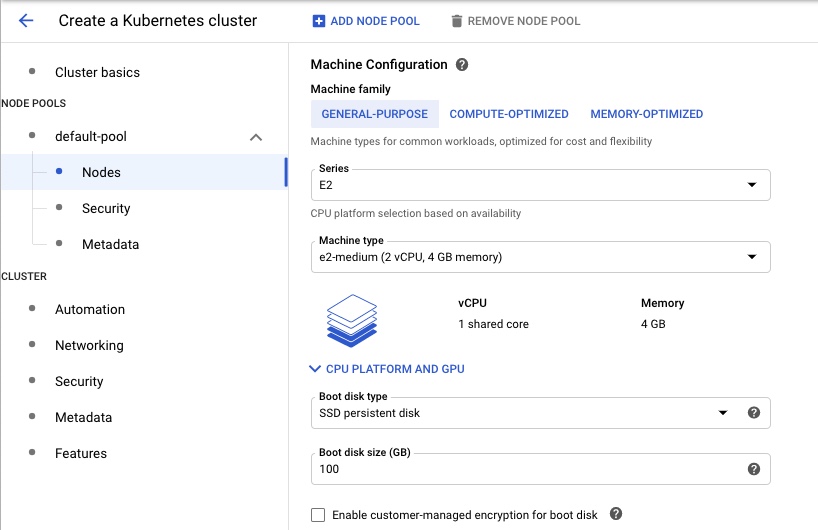
1. Create a GKE Cluster
Create a new GKE Cluster in the same Google Cloud project where your Cloud SQL is running.
Don’t forget to select the same Region where the Cloud SQL database and the Cloud Storage bucket are for the cluster.
In the wizard, open the Nodes Groups and select the Default Pool. Change the number of nodes to be 5. (By default is set to 3).
Open the Nodes menu and change the Machine Type to be n2-standard-2, also change the Disk to use SSD
2. Setup the Kubernetes Tools.
You will need to install kubectl. Once that’s done, you need to configure you’re new cluster. Run this command with the name of the cluster you created in step 1:
gcloud container clusters get-credentials name-of-cluster
3. Create Kubernetes Secrets
We will store in the Kubernetes Secrets two values: the Service account’s credentials JSON file you created in the Pre Requisites and the password to the database. Run these commands:
kubectl create secret generic google-service-account \
--from-file=service_account.json=/path/to/credentials.json
kubectl create secret generic db-secret \
  --from-literal=password='database password'
4. Deploy the Kubernetes artifacts
Go to the DeploymentExamples folder and choose one type: either SingleInstance or MultiInstances (check the beginning of this document to know the differences) and change to that folder.
You will need to edit some values.
In xcmetrics-deployment.yaml:
- Replace the name of your Cloud SQL connection name here:
yaml command: ["/cloud_sql_proxy", "-instances=Replace with your Cloud SQL connection string=tcp:5432", "-credential_file=/secrets/service_account.json"] - For Multi instance deployments: Change the name of the environment variables
XCMETRICS_GOOGLE_PROJECTandXCMETRICS_GCS_BUCKET.
For MultiInstance Deployments, in xcmetrics-jobs-deployment.yaml
- Replace the name of your Cloud SQL connection name here:
yaml command: ["/cloud_sql_proxy", "-instances=Replace with your Cloud SQL connection string=tcp:5432", "-credential_file=/secrets/service_account.json"] - Change the name of the environment variables
XCMETRICS_GOOGLE_PROJECTandXCMETRICS_GCS_BUCKET.
Now, you’re ready to deploy the XCMetrics artifacts:
Deploy the Redis artifacts:
kubectl create -f xcmetrics-redis-deployment.yaml
kubectl create -f xcmetrics-redis-service.yaml
Deploy XCMetrics
kubectl create -f xcmetrics-deployment.yaml
kubectl create -f xcmetrics-service.yaml
For MultiInstances deployments, deploy the XCMetrics Jobs:
kubectl create -f xcmetrics-jobs-deployment.yaml
kubectl create -f xcmetrics-jobs-service.yaml
If you want to use our Web UI for Backstage, deploy the Scheduled Jobs:
kubectl create -f xcmetrics-scheduled-jobs-deployment.yaml
kubectl create -f xcmetrics-scheduled-jobs-service.yaml
6. Verify the deployment
Run the command kubectl get services. You should get the list of the Services deployed and the External IP for the XCMetrics Backend:
NAME               TYPE           CLUSTER-IP    EXTERNAL-IP     PORT(S)        AGE
kubernetes         ClusterIP      10.12.0.1     <none>          443/TCP        5h4m
redis              ClusterIP      10.12.10.21   <none>          6379/TCP       139m
xcmetrics-jobs     ClusterIP      10.12.1.144   <none>          80/TCP         116m
xcmetrics-scheduled-jobs     ClusterIP      10.12.1.124   <none>          80/TCP         116m
xcmetrics-server   LoadBalancer   10.12.5.86    35.187.83.33   80:30969/TCP   139m
You can run curl -i http://external ip/v1/build to verify that everything is working. You should get a response like:
curl -i http://35.187.83.38/v1/build
HTTP/1.1 200 OK
content-type: application/json; charset=utf-8
content-length: 53
connection: keep-alive
date: Wed, 14 Oct 2020 17:48:00 GMT

{"metadata":{"total":0,"page":1,"per":10},"items":[]}
Use the new URL in your XCMetrics client. Pass the --serviceURL with the new value. In this example will be http://35.187.83.38/v1/metrics